# Getting Started
This section provides instructions on how to install FastSchema as a complete backend.
Source: https://fastschema.com/docs/getting-started
## Installation
This section provides instructions on how to install FastSchema as a complete backend.
If you are looking to use FastSchema as a Web Framework, you can follow the instructions in the [Web Framwork](/docs/framework/) section.
### Method 1: Using Docker
1. **Pull the Docker Image**:
```bash
docker pull ghcr.io/fastschema/fastschema:latest
```
2. **Run the Docker Container**:
```bash
mkdir data
docker run \
-u "$UID" \
-p 8000:8000 \
-v ./data:/fastschema/data \
ghcr.io/fastschema/fastschema:latest
```
```bash {2}
> Using app directory: /fastschema
> APP_KEY is not set. A new key is generated and saved to /fastschema/data/.env
> Using default sqlite db file: /fastschema/data/fastschema.db
> Serving files from disk [public:/files] at /fastschema/data/public
> Visit the following URL to setup the app: http://localhost:8000/dash/setup/?token=anpDXDBymatYLIITreQgGaVdhLanpDXD
```
You can now process the setting up by visiting `http://localhost:8000?token={token}`.
_The setup token `{token}` is displayed in the terminal._
### Method 2: Download the Binary from GitHub Releases
1. **Download the Binary:**
- Navigate to the FastSchema [GitHub Releases page](https://github.com/fastschema/fastschema/releases).
- Select the latest release.
- Download the appropriate binary for your operating system (e.g., Linux, macOS, Windows).
2. **Extract the Binary:**
```bash
unzip fastschema_*.zip
```
3. **Run the Binary:**
- Open a terminal or command prompt.
- Navigate to the directory containing the downloaded binary.
- Run the following command:
```bash
./fastschema start
```
### Method 3: Build from Source
1. **Clone the Repository:**
```bash
git clone https://github.com/fastschema/fastschema.git
cd fastschema
git submodule update --init --recursive
```
2. **Build and run the Binary:**
```bash
go build -o fastschema cmd/main.go
./fastschema start
```
or run the development server:
```bash
make dev
```
FastSchema requires Go 1.24 or later to build.
`make dev` command uses `air` to watch for changes and automatically rebuild the binary.
You can install `air` by running `go install github.com/cosmtrek/air@latest`.
For more information, refer to the [Air](https://github.com/cosmtrek/air) repository.
**Note:** The dashboard is built in the separate `fastschema/js` monorepo (`pnpm turbo run build --filter=dash`) and embedded into the core binary. The resulting bundle is available at `./dash/` (via Go `//go:embed`). For end-users, the dashboard is included in the pre-built binary and Docker image.
## Setup
After you have installed FastSchema, you can access the setup page by visiting `http://localhost:8000?token={token}`.
The setup token is displayed in the terminal when you run FastSchema for the first time.
```bash {2}
Visit the following URL to setup the app:
http://localhost:8000/dash/setup/?token=anpDXDBymatYLIITreQgGaVdhLanpDXD
```
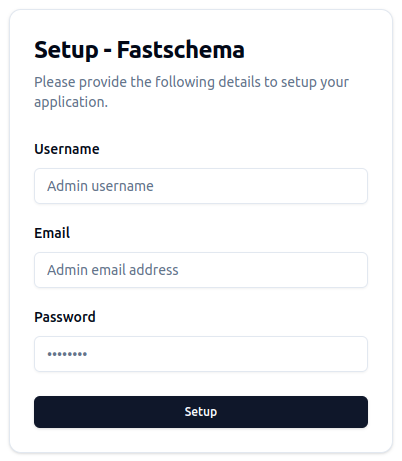 At the setup page, you will be asked to provide the following information:
- **Username**: The admin username.
- **Email**: The admin email.
- **Password**: The admin password.
After you have filled in the required information, click the **Setup** button to complete the setup process.
Congratulations! You have successfully installed FastSchema, you can now login and start creating your schemas and content.
## Configuration
Fastschema use environment variables for configuration. You can set the environment variables in `./data/.env` file or in the system environment.
By default, Fastschema uses SQLite as the database. You can change the database configuration by setting the following environment variables:
```ini
APP_KEY=a_32_characters_random_string
APP_PORT=8000
APP_BASE_URL=http://localhost:8000
APP_DASH_URL=http://localhost:8000/dash
APP_API_BASE_NAME=api
DB_DRIVER=mysql
DB_NAME=fastschema
DB_HOST=127.0.0.1
DB_PORT=3306
DB_USER=root
DB_PASS=123
STORAGE='{"default_disk":"public","disks":[{"name":"public","driver":"local","root":"./public","public_path":"/","base_url":"http://localhost:8000/"},{"name":"my_s3","driver":"s3","root":"/files","provider":"DigitalOcean","endpoint":"sfo3.digitaloceanspaces.com","region":"sfo3","bucket":"my_bucket","access_key_id":"s3_access_key_id","secret_access_key":"s3_secret_access_key","base_url":"https://cdn.site.local"}]}'
```
For more information, refer to the [Configuration](/docs/configuration) documentation.
At the setup page, you will be asked to provide the following information:
- **Username**: The admin username.
- **Email**: The admin email.
- **Password**: The admin password.
After you have filled in the required information, click the **Setup** button to complete the setup process.
Congratulations! You have successfully installed FastSchema, you can now login and start creating your schemas and content.
## Configuration
Fastschema use environment variables for configuration. You can set the environment variables in `./data/.env` file or in the system environment.
By default, Fastschema uses SQLite as the database. You can change the database configuration by setting the following environment variables:
```ini
APP_KEY=a_32_characters_random_string
APP_PORT=8000
APP_BASE_URL=http://localhost:8000
APP_DASH_URL=http://localhost:8000/dash
APP_API_BASE_NAME=api
DB_DRIVER=mysql
DB_NAME=fastschema
DB_HOST=127.0.0.1
DB_PORT=3306
DB_USER=root
DB_PASS=123
STORAGE='{"default_disk":"public","disks":[{"name":"public","driver":"local","root":"./public","public_path":"/","base_url":"http://localhost:8000/"},{"name":"my_s3","driver":"s3","root":"/files","provider":"DigitalOcean","endpoint":"sfo3.digitaloceanspaces.com","region":"sfo3","bucket":"my_bucket","access_key_id":"s3_access_key_id","secret_access_key":"s3_secret_access_key","base_url":"https://cdn.site.local"}]}'
```
For more information, refer to the [Configuration](/docs/configuration) documentation.