Getting Started
Installation
This section provides instructions on how to install FastSchema as a complete backend.
If you are looking to use FastSchema as a Web Framework, you can follow the instructions in the Web Framwork section.
Method 1: Using Docker
Pull the Docker Image:
bashdocker pull ghcr.io/fastschema/fastschema:latestRun the Docker Container:
bashmkdir data docker run \ -u "$UID" \ -p 8000:8000 \ -v ./data:/fastschema/data \ ghcr.io/fastschema/fastschema:latest
Example Output
> Using app directory: /fastschema
> APP_KEY is not set. A new key is generated and saved to /fastschema/data/.env
> Using default sqlite db file: /fastschema/data/fastschema.db
> Serving files from disk [public:/files] at /fastschema/data/public
> Visit the following URL to setup the app: http://localhost:8000/dash/setup/?token=anpDXDBymatYLIITreQgGaVdhLanpDXD
You can now process the setting up by visiting http://localhost:8000?token={token}.
The setup token {token} is displayed in the terminal.
Method 2: Download the Binary from GitHub Releases
Download the Binary:
Navigate to the FastSchema GitHub Releases page.
Select the latest release.
Download the appropriate binary for your operating system (e.g., Linux, macOS, Windows).
Extract the Binary:
bashunzip fastschema_*.zipRun the Binary:
Open a terminal or command prompt.
Navigate to the directory containing the downloaded binary.
Run the following command:
bash./fastschema start
Method 3: Build from Source
Clone the Repository:
bashgit clone https://github.com/fastschema/fastschema.git cd fastschema git submodule update --init --recursiveBuild and run the Binary:
bashgo build -o fastschema cmd/main.go ./fastschema startor run the development server:
bashmake devWARNING
FastSchema requires Go 1.24 or later to build.
make devcommand usesairto watch for changes and automatically rebuild the binary.You can install
airby runninggo install github.com/cosmtrek/air@latest.For more information, refer to the Air repository.
Note: The dashboard is built in the separate
fastschema/jsmonorepo (pnpm turbo run build --filter=dash) and embedded into the core binary. The resulting bundle is available at./dash/(via Go//go:embed). For end-users, the dashboard is included in the pre-built binary and Docker image.
Setup
After you have installed FastSchema, you can access the setup page by visiting http://localhost:8000?token={token}.
The setup token is displayed in the terminal when you run FastSchema for the first time.
Visit the following URL to setup the app:
http://localhost:8000/dash/setup/?token=anpDXDBymatYLIITreQgGaVdhLanpDXD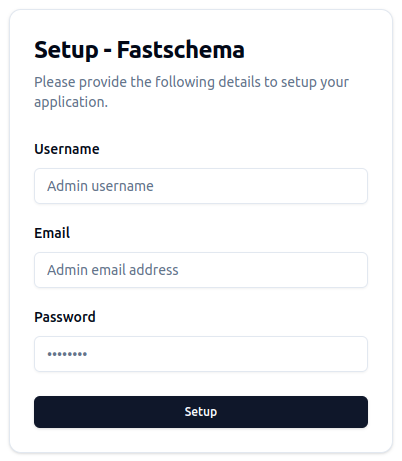
At the setup page, you will be asked to provide the following information:
- Username: The admin username.
- Email: The admin email.
- Password: The admin password.
After you have filled in the required information, click the Setup button to complete the setup process.
Congratulations! You have successfully installed FastSchema, you can now login and start creating your schemas and content.
Configuration
Fastschema use environment variables for configuration. You can set the environment variables in ./data/.env file or in the system environment.
By default, Fastschema uses SQLite as the database. You can change the database configuration by setting the following environment variables:
APP_KEY=a_32_characters_random_string
APP_PORT=8000
APP_BASE_URL=http://localhost:8000
APP_DASH_URL=http://localhost:8000/dash
APP_API_BASE_NAME=api
DB_DRIVER=mysql
DB_NAME=fastschema
DB_HOST=127.0.0.1
DB_PORT=3306
DB_USER=root
DB_PASS=123
STORAGE='{"default_disk":"public","disks":[{"name":"public","driver":"local","root":"./public","public_path":"/","base_url":"http://localhost:8000/"},{"name":"my_s3","driver":"s3","root":"/files","provider":"DigitalOcean","endpoint":"sfo3.digitaloceanspaces.com","region":"sfo3","bucket":"my_bucket","access_key_id":"s3_access_key_id","secret_access_key":"s3_secret_access_key","base_url":"https://cdn.site.local"}]}'
For more information, refer to the Configuration documentation.