Authentication
FastSchema comes with built-in Role-Based Access Control (RBAC) to manage user access to the all the resources.
Users
You can manage the users by going to the Admin Panel and clicking on the All Users link under the Content menu.
A User should belong to one or many roles. You can assign roles to the user by updating the user details.
Roles
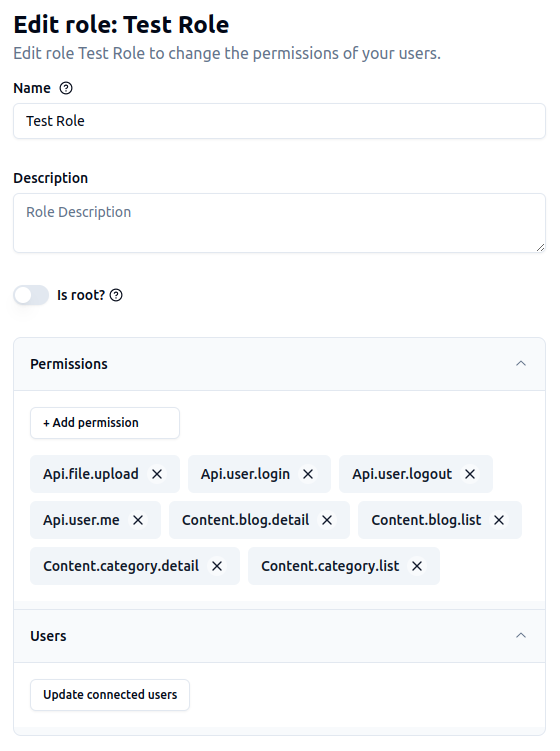
At the first time you run the FastSchema, it will create three default roles: admin, user, and guest. You can manage the roles by going to the Admin Panel and clicking on the Roles & Permissions link under the Settings menu.
You can create new roles, assign permissions to the roles, and assign roles to the users.
Root Role
A root role is a special role that has all the permissions. By default, the admin role is the root role.
You can make any role a root role by enabling the root option in the role update page.
Permissions
Permissions are the rules that define what a user can do. You can manage the permissions of a role by updating the role details.
IMPORTANT
If a user has multiple roles, the permissions of all the roles will be combined.

Authentication
Every FastSchema resources are protected by authentication except the following types of resources:
- Resource that was marked as
public: This must be set in the resource registration. - Resource that was granted to the
guestrole: By default, theguestrole has no permissions.
FastSchema uses JWT (JSON Web Token) for authentication. When a user logs in, the server will generate a JWT token and send it back to the client.
Request
POST /api/user/login HTTP/1.1
Accept: */*
Accept-Encoding: gzip, deflate, br, zstd
Accept-Language: en;q=0.9,ja;q=0.8
Cache-Control: max-age=0
Content-Type: application/json;charset=utf-8
Host: localhost:8000
Origin: http://localhost:3000
Referer: http://localhost:3000/
User-Agent: Mozilla/5.0 (X11; Linux x86_64) AppleWebKit/537.36 (KHTML, like Gecko) Chrome/125.0.0.0 Safari/537.36
Response
{
  "login": "admin",
  "password": "123"
}{
"data": {
"token": "<jwt token>",
"expires": "2024-06-24T20:21:10.085177874+07:00"
}
}The client should store the token and send it back to the server in every request.
There are two ways to send the token to the server:
- In the
Authorizationheader:Bearer <jwt token> - In the
Cookieheader:token=<jwt token>
GET /api/user/me HTTP/1.1
Accept: */*
Accept-Encoding: gzip, deflate, br, zstd
Accept-Language: en;q=0.9,ja;q=0.8
Authorization: Bearer <jwt token>
Cache-Control: max-age=0
Connection: keep-alive
Content-Type: application/json;charset=utf-8
Cookie: token=<jwt token>
Host: localhost:8000
Referer: http://localhost:8000/dash/
User-Agent: Mozilla/5.0 (X11; Linux x86_64) AppleWebKit/537.36 (KHTML, like Gecko) Chrome/125.0.0.0 Safari/537.36
IMPORTANT
The token will be expired after a certain time. The server will return 401 Unauthorized if the token is expired.
If the jwt token is valid, but the user does not have permission to access the resource, the server will return 403 Forbidden.
Auth Provider
Besides the built-in authentication, you can also use the third-party authentication providers such as Google, Facebook, GitHub, etc.
You can enable the third-party authentication by setting the environment variable AUTH. The value is the minified JSON string that represents the AuthConfig struct.
type AuthConfig struct {
	EnabledProviders []string                     `json:"enabled_providers"`
	Providers        map[string]map[string]string `json:"providers"`
}
Example
{
  "enabled_providers": ["github", "google"],
  "providers": {
    "github": {
      "client_id": "__github_client_id__",
      "client_secret": "__github_client_secret__"
    },
    "google": {
      "client_id": "xxxxxxxxxxxxxxxxxxxx.apps.googleusercontent.com",
      "client_secret": "__google_client_secret__"
    },
    "twitter": {
      "consumer_key": "twitter_consumer_key",
      "consumer_secret": "twitter_consumer_secret"
    }
  }
}
Auth Provider endpoints
/api/auth/:provider/login: Redirect to the provider login page./api/auth/:provider/callback: The provider will redirect to this endpoint after the user logs in.
Custom Auth Provider
Only GitHub and Google are supported at the moment. We will add more providers in the future.
If you want to add a custom provider, you can implement the fs.AuthProvider interface.
type AuthProvider interface {
	Name() string
	Login(Context) (any, error)
	Callback(Context) (*User, error)
}
FastSchema allow registering the auth provider maker function. The maker function should return a new instance of the AuthProvider.
package main

import "github.com/fastschema/fastschema/fs"

func main() {
  fs.RegisterAuthProviderMaker("custom", NewCustomAuthProvider)
}